Tiny Wren
What's that behind you Andy?
This advert inspired me, as I often ask myself "Where is that plane going?" when generally pottering about and looking out the window. Perhaps I'm a five-year-old at heart.
So I thought about building something that could answer that question for me. I suspect the neighbours might not like me building something of that scale on the bungalow, so I opted for a simple ambient screen/display in the office instead.
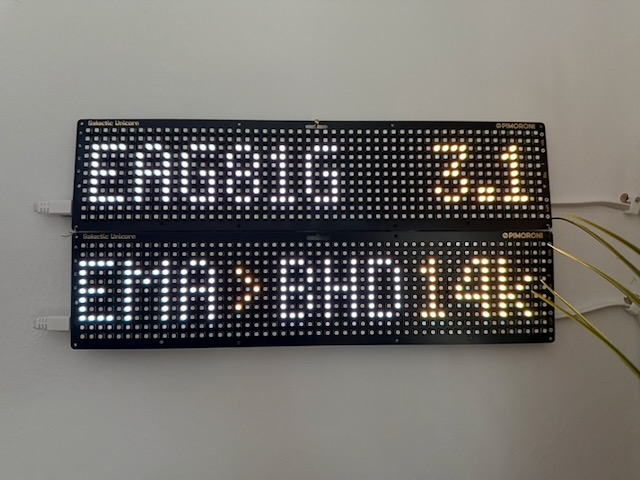
Here is what it's showing.
For the nearest plane that is less than 5 miles away:
- The callsign of the plane. EZY16FA.
- The distance from me in miles. 3.9.
- The airport it took off from. EDI = Edinburgh Airport.
- The airport it's landing at. STN = London Stansted.
- The plane's altitude. e.g. 33k (33,000 feet).
Then, when there are no local planes, show some temperature stuff:
- In: 20 (inside temperature).
- Out: 7 (outside temperature).
- Cons: 9 (conservatory temperature).
It's been running for over a year now, and it's rather stable!
Why build this / my requirements?
Be fun to learn about stuff. I wanted to play around with SDR, Raspberry Pis, microcontrollers and smart homes. Perhaps 3D printing?
Offline. It would be simple to throw a load of cash at an aviation API and just display it. That, however, would be costly and wouldn’t offer up-to-the-second info I could get by doing this locally.
Unobtrusive. I don’t want bright screens everywhere. If I had displays I wanted them to fit into my general smart home, so dimmable via smart dimmer. I want them to be liveable and not just a random bunch of wires on a desk.
Extendable. I wanted to add N devices that could show what is flying overhead. Think of a small screen in the conservatory, one in the living room, perhaps a local website — more in the future.
Easy to build. I’m not a radio or aviation expert, nor do I know much about building electronics. I have a light interest in all three, but you aren’t going to get me talking on my self-built HAM radio set anytime soon.
A play area. My day job means I don’t get to write code much, but I do love it. Part of this project gives me space to scratch that itch.
The Setup
PiPlane — Raspberry Pi
What it does
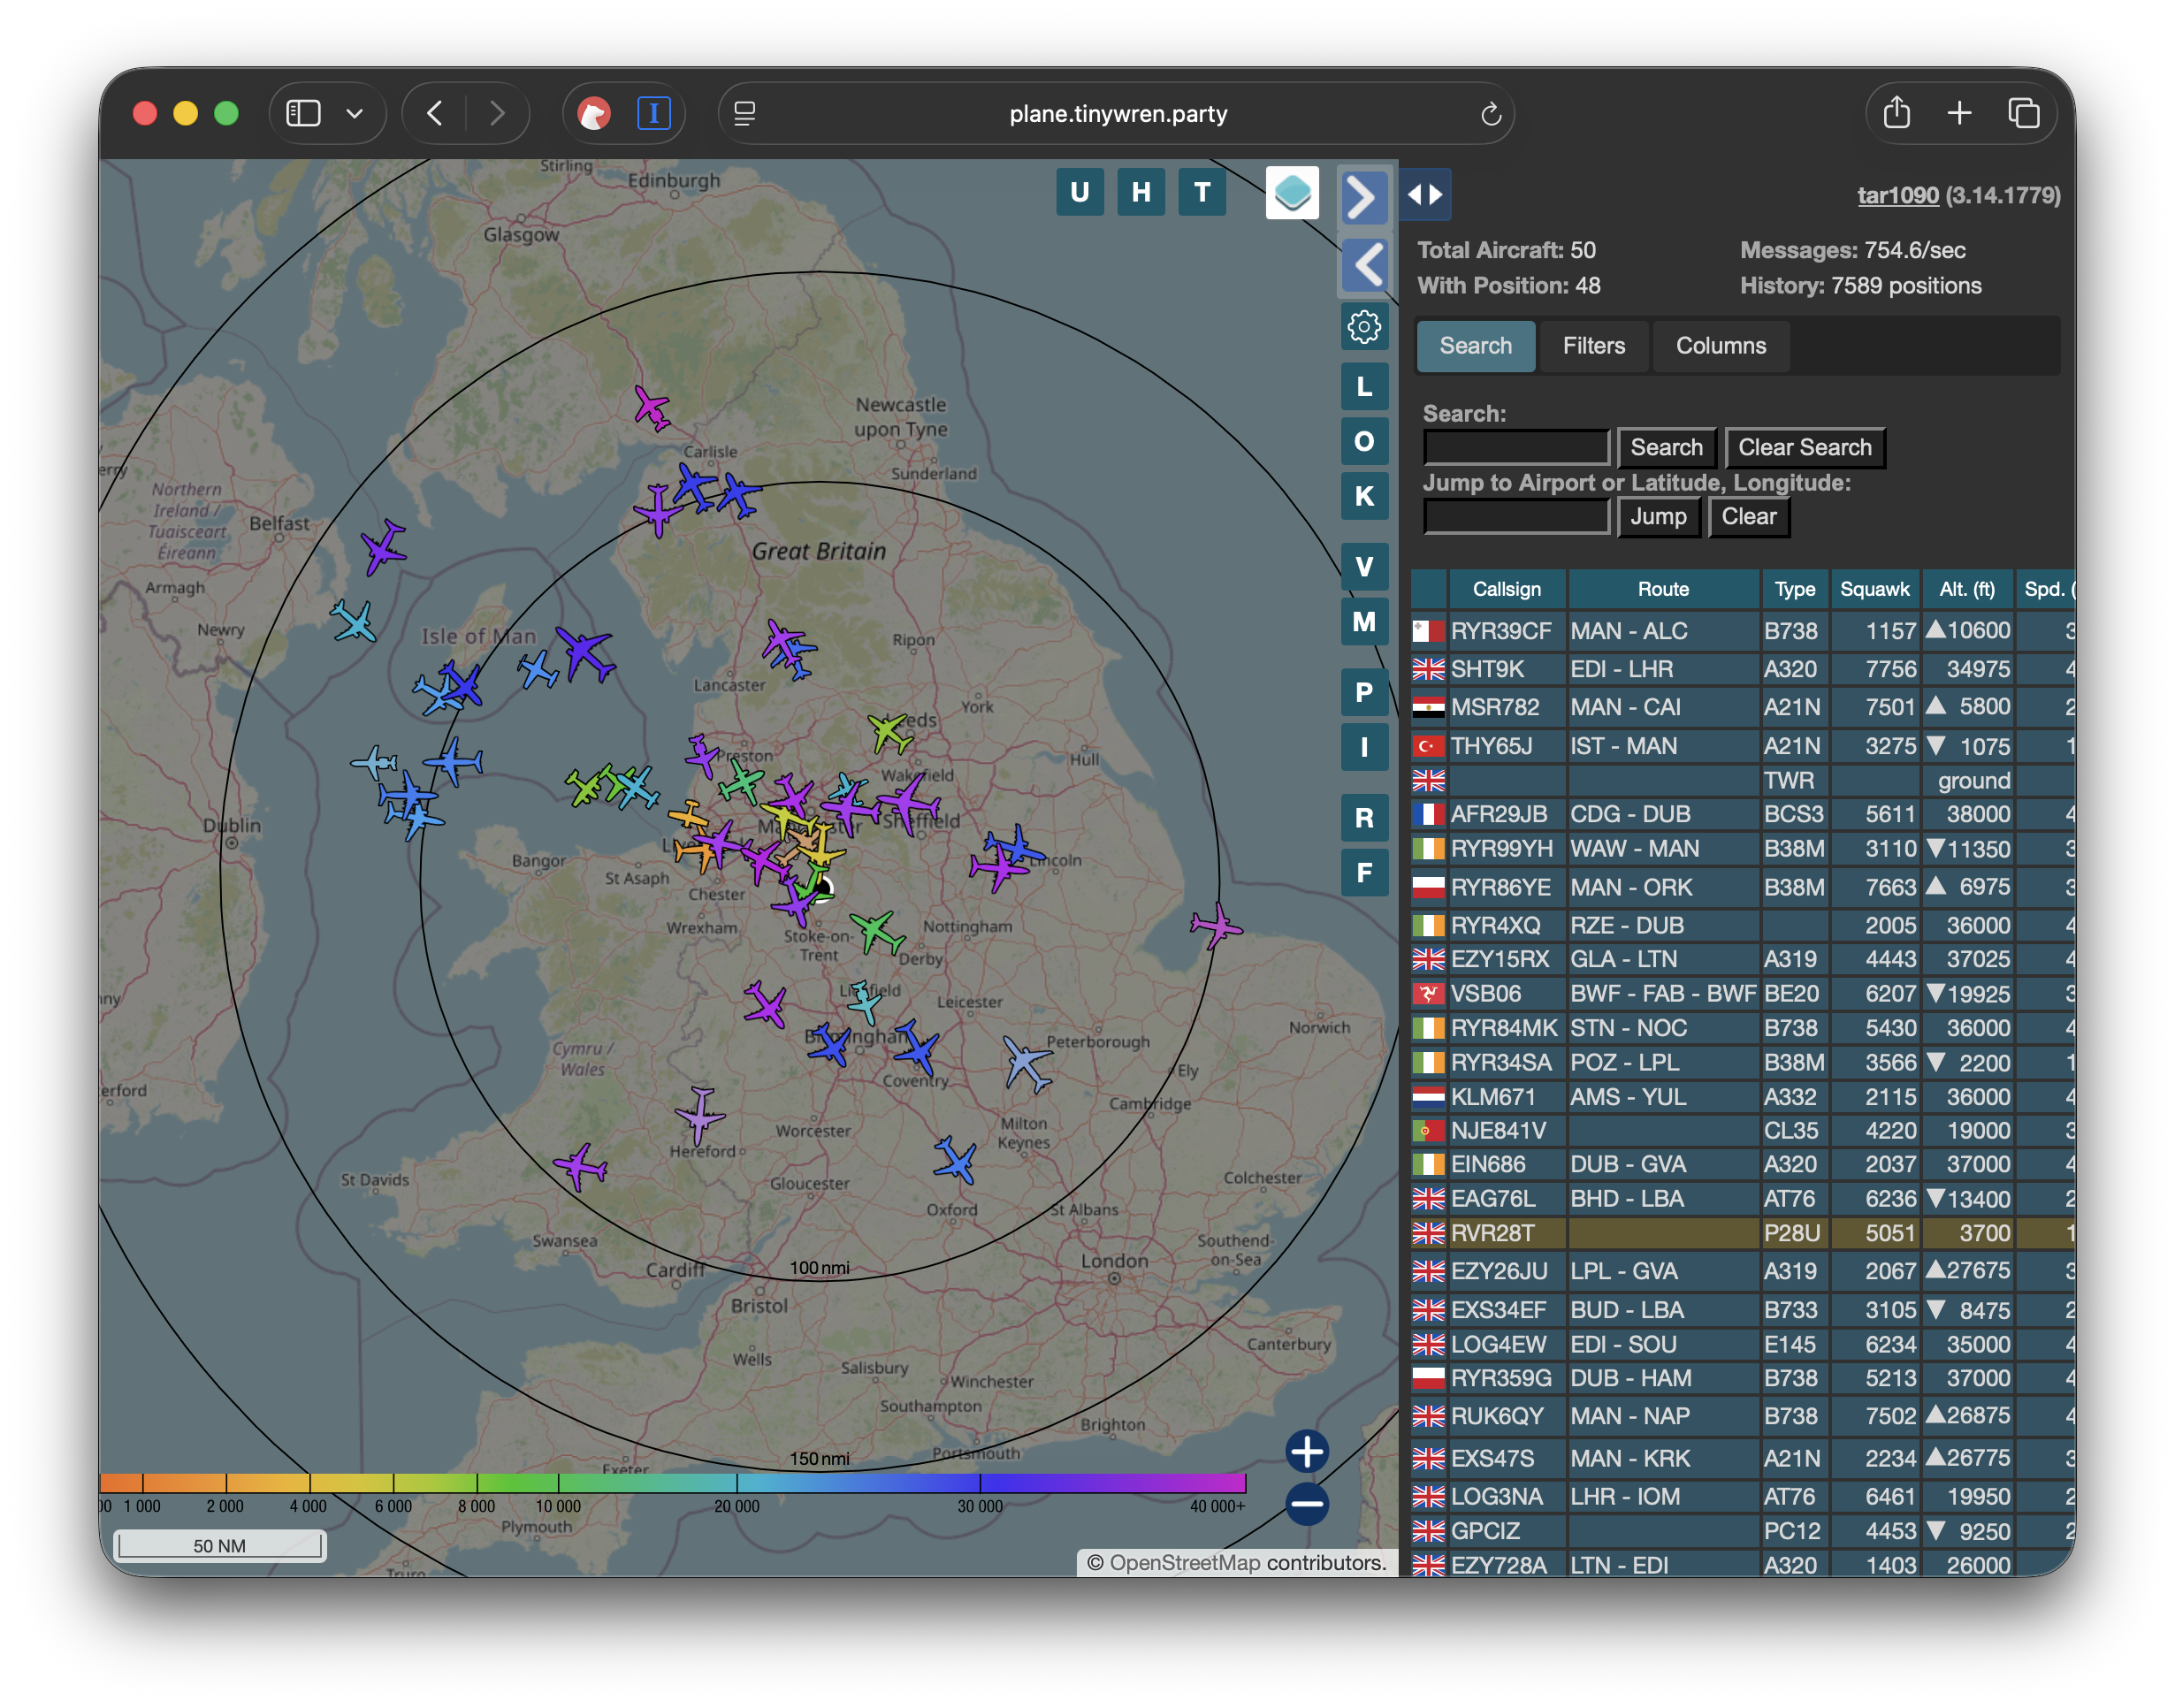
We have a little Raspberry Pi with a USB software-defined radio that listens to plane transponders. It enriches this transponder data from other sources, hosts a web interface (above), and also broadcasts the nearest plane to an MQTT server.
Hardware
- Raspberry Pi 4 — SD card and power supply.
- USB Software Defined Radio.
- A fancy aerial (though you can get away with a smaller one).
I have this installed in the garage, with the aerial in the loft. It gives OK range; if you wanted you can mount this outside, high and away from obstructions. I’m not too bothered about chasing perfect reception/coverage here.
Home Assistant
What it does
Home Assistant is great for many things. In this case I already had it running a load of smart-home services and, importantly, a Mosquitto MQTT server instance. Rather than run multiple message queues on the network, it made sense to use a single MQTT broker for the nearest-plane messages.
Hardware
- Intel NUC PC running Proxmox and HAOS.
The Displays
Unicorn(s)
What's it made of?
- 2 × Pico 2 W Unicorn
I got one to mess around with, then added another, so it's an odd setup. Now they have bigger ones, so if I were doing this again I'd grab that. The code is ropey, but it's using MicroPython and listening to the local plane and smart-lamp topics. They also have a few climate temperature topics (inside, outside, conservatory) populated from Home Assistant integrations. I also hooked it up to the doorbell topic to make a noise when triggered, but that's slightly redundant now.
OLED Plane Display
What's it made of?
- Raspberry Pi Zero W
- Raspbian
- OLED screen
This sits in the living room for now. I’m working on my 3D CAD skills to print a nicer container for it, but this temporary box does for now.
The Software
So really the job is to:
- Collect transponder information
- Add in airframe and destination information for the planes
- Find the nearest one and send it over to the Home Assistant MQTT server
- Configure the displays to show plane and temperature info
- Configure Home Assistant and the displays to work as dimmable lamps in my smart-home setup
1. Collect transponder information
Thankfully, loads of folks have already done the hard work of turning a tiny computer and a cheap USB FM/TV tuner into a device that can listen to plane-transponder transmissions. Thousands of people have them set up around the world and they populate services like flightradar24.com and flightaware.com. I followed the FlightAware installation details.
Part of the FlightAware installation is the setup of dump1090-fa, an open-source project that listens and decodes the plane-transponder broadcasts from a software-defined radio. You can see the details over here: dump1090-fa.
When installed you can get a list of aircraft your device is tracking as JSON at:
http://127.0.0.1/dump1090-fa/data/aircraft.json
There are probably better ways of getting this out of dump1090 than relying on a JSON feed over HTTP. However, when looking into the nitty-gritty of possible dump1090 outputs, my eyes start to glaze over and I remember I don’t particularly want to go into the weeds on this.
This JSON endpoint has the aircraft with callsigns, lat/longs, headings, altitude and a whole load of other data updated every second. JSON over HTTP is easy for a hack like me to play with.
2. Add in airframe and destination information for the planes
The transponders from the planes won’t tell you their entire flight plans, but you do get the plane's callsign.
A callsign is the unique identifier used in radio communications between an aircraft and air traffic control, or between aircraft. In the case of scheduled flights (the vast majority of flights near me), the format of these callsigns denotes the company and a flight number, e.g.:
BA1383 = British Airways and route number 1383.
That route number typically corresponds to a regular route — in this case, Manchester to Heathrow.
How to convert a callsign to a route, all locally? Step in the folks over at Virtual Radar Server who built the following database to use for their virtual ATC software:
vradarserver/standing-data: Dumps of aviation data from Virtual Radar Server's SDM site.
(Interestingly, this is the same dataset that the adsb.lol API uses.)
This is stored as CSVs, but for my needs it's better in a DB, so I have a simple script that downloads this info and puts it into a simple SQLite DB. It's scheduled to update once a week or so, which seems to be enough for my needs.
So I now have my callsign along with the airports the plane has departed from and is arriving at.
Airframe info
I also wanted a little bit of detail about the planes themselves — who the operator is and the aircraft type. The folks over at adsbexchange provide this:
http://downloads.adsbexchange.com/downloads/basic-ac-db.json.gz
As with the flight data, I import the airframe info into a local DB.
3. Find the nearest one and send it over to the Home Assistant MQTT server
Now we need to pull the flight data and the airframe information together, and ping it over to the MQTT server. So I built a simple Python script that does the following:
- Find the nearest plane from the dump1090 feed
- Enrich the plane info with flight and airframe info from our local SQLite DBs
- Send over MQTT to be consumed by whatever display we want
The first is pretty simple: open the dump1090-fa aircraft feed, look up the plane lat/long and my home's lat/long, calculate distance and sort the aircraft array by nearest. Add the distance to the object and select the nearest from the array.
Then, for the nearest plane, take the callsign and query the two local copies of data for airframe and flight info in our local DB.
Then it's simply the case of pinging it over MQTT via a library like paho-mqtt.
A final MQTT message we send to our Home Assistant server looks like this if a plane is within 5 miles, and is updated every few seconds. In this example, a Boeing 737-800 operated by ASL Airlines UK, going from Manchester Airport to Charles de Gaulle. We even get detailed fields such as roll, speed, and the rather interesting squawk codes.
{
  "hex": "407f6e",
  "flight": "ABV9AN",
  "alt_baro": 13975,
  "alt_geom": 14075,
  "gs": 332.6,
  "ias": 288,
  "tas": 354,
  "mach": 0.56,
  "track": 142.8,
  "track_rate": 0.06,
  "roll": -0.2,
  "mag_heading": 149.8,
  "baro_rate": 3520,
  "geom_rate": 3488,
  "squawk": "6301",
  "emergency": "none",
  "category": "A3",
  "nav_qnh": 1013.6,
  "nav_altitude_mcp": 19008,
  "nav_altitude_fms": 37008,
  "nav_heading": 149.8,
  "lat": 53.108329,
  "lon": -2.271908,
  "nic": 8,
  "rc": 186,
  "seen_pos": 0.4,
  "version": 2,
  "nic_baro": 1,
  "nac_p": 10,
  "nac_v": 2,
  "sil": 3,
  "sil_type": "perhour",
  "gva": 2,
  "sda": 2,
  "mlat": [],
  "tisb": [],
  "messages": 5412,
  "seen": 0.3,
  "rssi": -2.9,
  "distance": 4.98,
  "inflated": true,
  "RouteId": 560806,
  "Callsign": "ABV9AN",
  "OperatorId": 1256,
  "OperatorIcao": "ABV",
  "OperatorIata": "",
  "OperatorName": "ASL Airlines UK",
  "FlightNumber": "9AN",
  "FromAirportId": 286,
  "FromAirportIcao": "EGCC",
  "FromAirportIata": "MAN",
  "FromAirportName": "Manchester",
  "FromAirportLatitude": 53.3536987304688,
  "FromAirportLongitude": -2.27495002746582,
  "FromAirportAltitude": 257,
  "FromAirportLocation": "Manchester",
  "FromAirportCountryId": 191,
  "FromAirportCountry": "United Kingdom",
  "ToAirportId": 82,
  "ToAirportIcao": "LFPG",
  "ToAirportIata": "CDG",
  "ToAirportName": "Charles de Gaulle",
  "ToAirportLatitude": 49.0127983093,
  "ToAirportLongitude": 2.54999995232,
  "ToAirportAltitude": 392,
  "ToAirportLocation": "Paris",
  "ToAirportCountryId": 65,
  "ToAirportCountry": "France",
  "icaotype": "B738"
}
4. Configure the Displays to show Plane and temperature info.
I'm not going to go into super detail on this, becuase my code here is hacky as hell. The key things is though, the MiroPython Galactic Unicorn libraries are really detailed, so is mostly just editing them and using a simple MQTT client. For the smaller OLED display, similar, but as its running on a normal Raspbian instance I'm using python3 running as a service.
5. Configure HomeAssistant and the displays to work as dimmable lamps in my smarthome setup
I wanted to be able to treat the displays as Smart lamps so I can switch them off with Hue Dimmer switches, or via Siri. To do this, I added the following configuration in to HomeAssistant config yaml. Basically creating lights that which when interacted with would publish messages to specific mqtt topics the displays could listen to and act accordingly.
mqtt:
  - light:
      unique_id: "unicorn_id"
      name: "Unicorn light"
      state_topic: "office/unicorn/status"
      command_topic: "office/unicorn/switch"
      payload_on: "ON"
      payload_off: "OFF"
      brightness_state_topic: 'office/unicorn/brightness'
      brightness_command_topic: 'office/unicorn/brightness/set'
      qos: 0
      optimistic: true
  - light:
      unique_id: "planedisplay_id"
      name: "Plane display"
      state_topic: "livingroom/planedisplay/status"
      command_topic: "livingroom/planedisplay/switch"
      payload_on: "ON"
      payload_off: "OFF"
      brightness_state_topic: 'livingroom/planedisplay/brightness'
      brightness_command_topic: 'livingroom/planedisplay/brightness/set'
      qos: 0
      optimistic: true
I added these to Rooms in the HomeAssistant interface. This means now, Unicorn, is turned off with the same Hue dimmer switch I use to turn off the lights at night.
Conclusions / next stuff to do
I have had loads of fun on this one. The Unicorns sit behind me in meetings at work and seem to interest folks. For me, its a nice little useful project and means I can add to it, tinker and play, whilst being geniunaly useful as a thing/product just for me.
Future things I will probably do with it.
- Totally clean up the code and share it here.
- I could alter the displays to highlight military planes which might be slightly further away. They wont have route info, but I could show the type of plane.
- 3D print some nicer cases for the displays.
- Use slight larger OLED screen for the living room display.
- For Unicorn displays I’d like to make it move through modes of what its displaying a little easier / with manual controls.
- FlipDot displays could be a possibility. Though haven’t found a simple premade solution that I could use with a API I could hook up to. No middle ground between “build your own from displays taken out of a bus sign”, to “spend thousands on a locked down app driven display”. Wonderful resource over here with a similar Plane theme .. Flip Dot Displays with Raspberry Pi.
- Could move over from the FlightAware based installation to something like this really impressive project (which brings together lots). sdr-enthusiasts/docker-adsb-ultrafeeder: ADSB-Ultrafeeder is an all-in-one ADSB container with readsb, tar1090, graphs1090, autogain, multi-feeder, and mlat-hub built in
- Probably should migrate from the polling of the aircraft.json to something else!
- Dimming of the displays work fine, I would go a bit futher and see if I could turn Unicorn display to coloured bulbs in HomeAssistant, so I could change the themes around a bit
06/02/2026